Prepare for the worst and hope for the best. Here are some common “what if” scenarios that you should be prepared for in a cycling event.
You get a flat tire or a mechanical issue Getting a flat tire is unfortunate but should not completely ruin your event. Carry all the necessary tools, including a tube that fits your tire (even if you ride tubeless). If you know how to change the tube on your own, get to work. If you don’t know how to change a tire, you will need to wait for a good samaritan to stop (which is less likely in an event) or wait for the event/first aid car. Keep your head up and watch for the event vehicle, as they may not see you. Expect to wait for at least 20 minutes. If you are close to an aid station, walking there might be faster than waiting.
You lose the friends you were supposed to be riding the event with It is challenging to keep tabs on friends, especially in a mass start event. If your goal is to ride the entire event with your friends, make a plan ahead of time to regroup if you lose each other
You get dropped from your group and are now riding solo You have four choices: Choice #1: Change your strategy and your pace, expecting that you may be riding alone for most or all of the event. Choice #2: Take this opportunity to stop at the next aid station, use the bathroom and refuel. Then get ready to jump into the next group when it rolls through. Choice #3: Ride slow, take some time to recover, and wait for the next group to catch you. Choice #4: Continue to ride at your race pace. When you catch up to a rider (who is not suffering), ask them if they would like to draft behind you. Continue to pick up riders this way until you have at least 4-5 riders in your group. Help them get into an organized pace-line and then take a break at the back. If you work together, you may even catch up to a larger group.
You are in a great group but have to stop at an aid station Ideally, you only stop when others in your group stop. Talk to the people around you. Chose a few riders who ride well, similar to your fitness level, and ask them if they want to stop with you. Then wait for them at the aid station so you can ride together again.
You have to stop at several aid stations If you are a rider who needs to stop regularly to stretch, eat, pee, etc., then plan on riding most of the event on your own or with a group of friends who also stop frequently. Take your time and enjoy the day.
You run out of water If you are riding for under 4 hours, you should be able to carry enough water to last for the duration. Place a water bottle or two in your jersey pockets, so you have one bottle every hour. If you plan on riding longer than 4 hours, you will need to stop to refuel. See above for strategies.
You bonk or get heatstroke Ideally, if you prepare for the weather and pace yourself, this won’t happen. But if it does, stop at an end station, seek shade, and refuel. Call the medical staff to get a ride back to the start if you feel faint, nauseous, or dizzy. Don’t forget to text your friends waiting at the finish line for you, so they don’t worry about you.
Riding in a fondo or an organized event is much different than a weekend long ride.
If your goal is to make the most of the perks, like closed roads, fantastic food stops, and beautiful scenery, then your ride time will likely be slower and you will be out in the elements longer as you soak it all in.
If your goal is to use the event as an opportunity to push yourself to achieve a Personal Best (PB), then you will need to prepare for that type of intensity.
Pacing yourself is essential to having a successful day, whichever way you decide to ride..
#1. Learn the route
You need to know the route before planning your overall pacing strategy. Can you use up all your matches, knowing that the last 40km is a downhill coast, or do you need to save some? Are you drafting or riding alone? Where are the rest stops? How many will you use and when?
#2. Draft – or not
Watch your speed when riding in the middle of the back of the pack. If it feels comfortable and you are riding way faster than you ever have – enjoy the ride! Don’t get fooled into thinking you can ride faster and waste energy pulling at the front. Take the opportunity to cruise and recover. If you are faster (than the group you are in), wait for a smaller group to break away at the front and go with them, or wait for a faster group to catch up.
#3. Know yourself
Knowing and listening to your body is more complicated than it sounds. The body can fool even the most experienced riders; therefore, you need to plan the following ahead of time:
1. What, how much, and how often will you eat and drink?
2. How often can you push into Zone 4/5 without blowing up?
3. How many breaks do you need and for how long?
4. If you “feel” like the pace is relaxed or see that your power output is low – is it really too slow? Refer back to #1 and 2.
#4. Patience, Practice, and Perseverance
Learning how to pace is not easy, and the more gadgets you have, the more complicated it gets. Executing the perfect pacing strategy takes time, practice, and patience.
If you want to learn more about pacing, how to use a power meter (or heart rate monitor) and other training tips, I suggest the following books:
The Power Meter Handbook by Joe Friel
Training and Racing with a Power Meter by Hunter Allen and Andrew Coggan
A term used to refer to the clips and pedals that have replaced the earlier system of toe clips and straps. In a clipless pedal system, the pedal has a mechanism that locks it to a cleat screwed into the underside of the shoe.
All road riders, wanting to ride in an organized group ride, must be comfortable riding with clipless pedals.
For this reason, our first lesson in the Intro to Riding group is learning this skill.
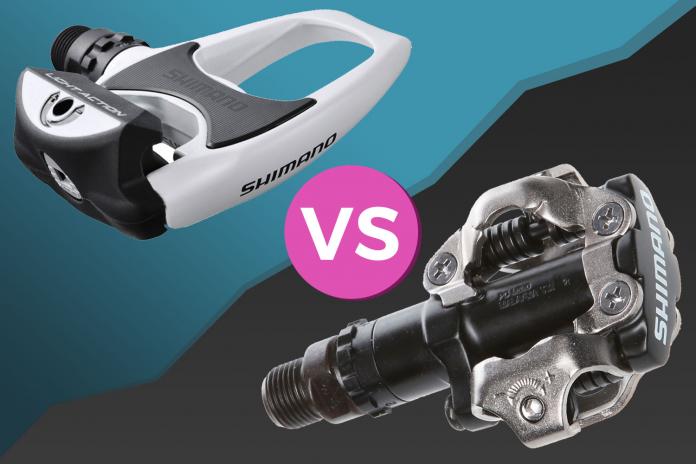
There are two main types of pedal and cleat combinations: Shimano SPD & Shimano SPD-SL.
Casual riders, commuters, and mountain bike riders should chose Shimano SPD as the shoes are more comfortable and easier to walk in and the cleat works well in muddy conditions.
Road cyclists and long distance riders should chose Shimano SPD-SL as you will be able to generate more energy through the pedal.
If you have the money and plan on riding a lot, it is well worth it to upgrade to carbon soles. You may have your shoes for at least 10 years and the carbon soles will make your ride more comfortable.
The following is list of pros and cons for each type.
Shimano SPD
great for commuting, gravel riding, mountain biking, recreational riders
can clip into both sides
easier (to learn how) to clip in and out, especially since you can choose a pedal with a wider base
easy to walk in the cleat is either recessed or the shoes have
less contact with the shoe which reduces performance as less power is transferred to the pedal
may be less comfortable for longer distances (3+hours)
both negatives are also highly dependant on your shoe choice as well
+ 2 bolt cleats made of metal (heavy but durable and works well in muddy conditions)
Shimano SPD-SL
most common road bike cleat
has the most contact with the shoe which transfers more power to the pedal
SL stands for super light
difficult to walk in as the cleat is larger and makes first contact with the ground
single sided so it takes some people a bit longer to learn how to clip in
+ 3 bolt cleats made of plastic (light but less durable and does not work well in mud)
Strengthening this “red zone” is one of the keys to improving your performance and remaining injury-free for every sport. Your power comes from the core.
These muscles stabilize your torso and provide the base on which you can build power and strength. It doesn’t help to have strong legs if you have a weak core.
Twice a year I offer an AB CHALLENGE series and I hope you will join me. I need to clarify that this challenge focuses purely on ABS; however, it is imperative that you use your core to complete the exercises.
In my workouts, I talk about the pelvic floor. Contracting the core is not the same as holding your breath or sucking in your belly. Both of these actions are dangerous when strength training as they increase intra-abdominal pressure, which is not good.
Check with yourself. Do you know how to hold your core? If not, please repeat this glute and core maintenance video once a week until you feel comfortable with this action and can activate the core with awareness, then automatically when required.
Yes, everything highlighted in red makes up your coreSucking in or holding your breath increases intra-abdominal pressure which is not a good thing.
Research shows that a loss of sweat equal to ONLY 2% of body weight greatly affects your performance through a decrease in power, an increase in muscle fatigue, and the inability to recover and build muscle. There is an excellent article on the Sports Cardiology BC Websitewhich I highly encourage you to read as it will forever change the importance you place on your hydration plan. If you are short on time, here is my bullet-point summary.
So what happens to performance when you are dehydrated?
A reduction of blood volume = lower Maximal Aerobic Power (V02 Max)
Increased core temperature = increased rate of glycogen breakdown in the muscles. This, in turn, leads to a greater amount of lactic acid which = muscle fatigue.
Increased levels of cortisol = lower levels of testosterone aka the muscle-building hormone which is required for recovery and growth.
5 hydration tips that will help improve your performance
1. Create a habit of drinking 300 to 500ml of water every morning when you first wake up. If you had a few alcoholic drinks the night before, add lemon and a pinch of salt and an additional 500ml.
2. Consume at least 300 to 500ml of water 1 to 2 hours before your ride/endurance workout. This is particularly important on hotter days.
3. Replace fluid loss with both water and electrolytes. Evidence shows that hydrating with just water doesn’t replace lost electrolytes, such as sodium, potassium, calcium, magnesium, and chloride resulting in a dramatic drop in performance. Use a richer mix during the winter (because you are drinking less) and a weaker solution during summer (because you’ll be drinking more).
4. During the ride, drink before you get thirsty. Take small sips every 10 to 15mins whether you want to or not. Ideally, you should aim to drink 1.25 to 1.5 litres of fluid every hour, depending on your body size and how much you sweat. NOTE: For some, this still might not be enough on really hot days.
5. Experiment and find what works for you.
EXCEPTIONS TO THE RULES
1. During short, intense workouts, such as the weekly Kits Energy workouts, limit your water intake immediately before and during the workout to avoid gastric upset.
2. On cold days avoid consuming large amounts of fluids in the morning as your body will want to reduce the supply of blood going around your body. It will do this by making you want to pee it out as soon as you get your cycling bibs tucked in nicely under all those layers.
WARNING If you feel faint, dizzy, or start to get a headache please stop, seek shade and medical assistance ASAP. Dehydration is a serious issue for athletes and can lead to death.
When exercising your body converts both glycogen (aka sugar) and fat into energy. Converting glycogen is quick and easy so these sources are used for high-intensity efforts such as short sprints and hill climbs. Converting fat takes longer so it is used more for lower intensity efforts like steady long training rides.
But this doesn’t mean that you can fuel up on nuts and fat for your long rides. Unless you have trained your body, by strictly following a Keto Diet, your brain only survives on sugar/glycogen of which we have a limited supply. So when you suddenly feel tired, dizzy, lightheaded, short-tempered, or sick during a ride, this is usually because you don’t have enough sugar going to your brain.
We call this lack of glycogen, “bonking”. You may have already experienced this so you will know that it is an extremely difficult state to reverse.
To avoid BONKING, always stay one step ahead of what your body needs.
Whether you feel like eating or not, following a predetermined schedule will ensure that you avoid “the bonk”. Set a timer on your watch to remind you.
Normally we count calories so that we don’t overeat. Now I’m teaching you to count calories so that you eat enough. The time to diet is not on the bike.
The timing of when you eat and the number of calories you eat at each interval are the keys to having a great ride.
If you eat too much at one time, you will upset your stomach. As you are working hard, your blood is in your muscles trying to do work – not in your stomach digesting food.
Everyone is unique in regards to how much they can digest comfortably. But 200-300 calories/hour is what is usually recommended. If you can eat while still pedaling, it is best to eat little bites of food every 10-15mins instead of the whole 200/300 calories at once.
It is your job to find out which types of foods and combinations of carb, protein, and fat percentages work best for you and your type of riding.
The following is a guideline to get you started. Add or subtract calories as your stomach insists or your energy demands require.
Always start a ride well hydrated and with enough fuel (inside of you) to last 60-90 minutes. You should NOT need to eat for a ride less than 90minutes.
Your pre-ride meal should be eaten within 1-3 hours before the ride, and consist of mainly carbohydrates. Fat and protein take 2-3hrs to digest so don’t eat them right before a hard workout. Avoid foods with high fiber as they also slow down digestion and may break up your ride with too many bathroom stops. As fat and protein digest slower, you can eat more of them before longer rides as you will use this stored energy later in the ride. Examples: toast with peanut/almond butter and banana, yogurt and granola and fruit, fruit smoothie, oatmeal with honey, eggs and toast, bagel and cream cheese, muffin
During the ride eat small bites but eat often. Eat your first snack 45-60minutes into the ride. Your snack should contain 200-300 calories of mainly simple carbs with very little fat and protein. Generally speaking the smaller you are, the less you need to eat, however, there are exceptions to every rule.
Examples: fruit bars, gels, boiled potatoes, bananas, fig newtons, sesame snaps, shot bloks, cliff bars, dates, homemade granola bars or cookies, sharkies, or a drink with calories in it like pure maltodextrin, Scratch, Vega Sport, Eload, etc.
It is best to have a variety of food with you so you can change the balance of carbs, protein, and fat throughout the ride. DO NOT BRING ONLY SUGAR and AVOID CAFFEINE until closer to the end of the ride.
Don’t put your body into a state of extreme highs and lows by overloading the body with pure sugar and caffeine. Consuming ONLY pure sugar will place you on an insulin roller coaster and will quickly make your stomach rebel. The exception to this rule would be an intense race where you are pushing a hard effort for the whole ride or the event is less than 2.5 hours.
Foods to avoid before or during a ride: – apples, berries, prunes (too much fibre) – nuts or high fat foods (a few are ok at the start of the ride) – large amounts of meat or protein including high protein bars (too long to digest) – salad or only veggies (you need calories not vitamins right now)
Hydration Use the rule of a minimum of one full water bottle of water (with added electrolytes or salt and lemon depending on how much you sweat) for every hour on the bike.